

How To Install Roller Shade Brackets
Standard Installation Instructions
Tools you will need
- Screwdriver
- Measuring tape
- Step stool or ladder
- Pencil
- Drill
- three/32″ drill bit to predrill screw holes
- 1/iv″ drill chip for wall anchors

| PARTS LIST | QUANTITY |
|---|---|
| Shade | 1 |
| Slat for Hem Pocket | 1 |
| Brackets | two |
| Mounting Screws | 4 |
| Plastic Anchors | four (For Drywall or Plaster Mounting) |
Step 1. Subclass Location & Installation
Your window shade can be installed either inside the window frameor outside the window frame or on the ceiling. When measuring and installing shades, brand sure there is a "play" between the roller and the brackets. Shades mounted too tight in the brackets will not function properly. Adhere brackets to inside or exterior of casing or to the ceiling.

![Bracket Location & Installation - Standard Install - Standard Shades [the shade cloth rolls off the back of the shade] - the slotted bracket goes on the left side of the window, and the slot opening faces up or out, toward the room.](https://media.justblinds.com/infopages/images/installation/roller-shades/standard-install.jpg)
Step 2. Mounting the Shade
For Within Mounting
Permit ane/4″ clearance between top of frame andfully rolled-up shade. This will provide plenty clearance to elevator shade into slotted bracket. Spring loaded tip provides up to iii/viii″ extra width if needed. Ever insert the pin end into the right side subclass kickoff. If the brackets are installed as illustrated (facing out), place the pin into theinner hole of the right subclass. If the brackets are installed facing downwardly (like Ceiling Mount), identify the pin into the outer pigsty of the correct bracket. Push button into bracket to compress the spring, and so identify the metal tab onthe left side of the shade into the slot of the left bracket.
For reverse-roll shades (inside mount simply!), the slotted bracket goes on the right, and the open part of the bracket must face the window – the bracket should be mounted to the top of the window frame [encounter illustration].
For Outside Mounting / Ceiling Mount
Hold shade to desired position,making sure it is level, and place pencil marks at each cease of the roller. Secure brackets. Insert the round pivot stop into the inner hole of the correct bracket. For ceiling mount, insert the pin into the outer hole. And so insert the other end of the shade into the slot of the left subclass.
Adjusting for Roller Tension
To tighten, lower the shade most 18 inches from the superlative, remove from window brackets. Roll up shade all the way to the top past hand, then replace in brackets.
To loosen, raise the shade to the top and remove from brackets. Unroll about 18 inches and supplant in brackets. Repeat until there is a proper tension. Roller should not be as well tight. Think, when a window shade refuses to curlicue up, the leap is too loose. When it won't stay downwardly, the roller spring is as well tight.
Caution: Overwinding may issue in permanent damage.
How to Operate
 If this shade does non scroll straight, correct as follows:
- Make sure brackets are mounted level, or the shade volition not ringlet straight. If shade veers toward the right, correct by lowering shade completely and placing a piece of tape (multiple pieces may be necessary) equally close to the left edge of the roller as possible. Information technology will act as a shim.
- If shade veers toward the left, correct by lowering shade completely and placing a piece of tape (multiple pieces may be necessary) as shut to the right edge of the roller equally possible. It will human action as a shim.
Care
Cleans easily with a damp sponge or soft fabric. Allow the shade to hang it's full length for a minimum of 72 hours to minimize wrinkles and creases.
Deluxe Installation Instructions
Tools you volition need
- Record measure
- Pencil
- Drill
- Drill $.25
- Screwdriver
- Stride stool or ladder
Stride 1. Mount the Brackets
Attach the brackets to the window frame, molding or ceiling as shown. The brackets are "universal" – at that place are no "correct" and "left" brackets. Mark the screw locations with a pencil – pre-drill the spiral holes using a five/64″ drill bit.

Step 2. Install the Shade
Put the spring loaded tip into the bracket, and then insert the hook arms on the opposite side of the shade into the two hook arm receiver holes of the subclass. In one case the two hook arms are through the holes, gently pull downwards until the two claw artillery accept locked securely to the bracket. For cord control shades, the bottom of the clutch should always betoken direct down.

Footstep 3. Install the Bracket Covers (Outside Mount only)
Subclass covers slide onto the subclass as shown until they snap into position.

Step 4. Install the Tension Device – for Cord Control Shades
 The tension device reduces the hazards of strangulation and entanglement of young children or pets by limiting access to the control cord. Ballast the Tension Device that is attached to the shade's control cord, to the window frame or wall, so that young children cannot pull the cord around their necks.
Lower the shade, and so position the Tension Device on the window frame or the wall and so that the Tension Device and command cord do not interfere with raining and lowering the shade. The Tension Device should be installed without stretching or pulling downward on the control cord. Stretching the control cord will crusade excessive wear. Do not twist or cross the control string. Mark the screw hole locations with a pencil, then pre-drill the screw holes using a 3/32″ drill bit. For hollow dry wall installation, use wall anchors (not included).
Operating the Shade
Cordless Shades
- Raise the Shade: Grip the center of the bottom hem (do not release your grip until you have set the shade at the desired height) – pull the shade away from the window sill, if necessary – pull direct downwardly to release the jump motor that controls the movement of the shade – permit it to rise to any desired point, and so pull downward gently to stop/set the shade.
- Lower the Shade: Pull straight downwards and s1op/se1 the shade as described above.
- Adjusting Leap Roller Tension: To tighten (increase tension), lower the shade most xviii″ from the tiptop, and so remove the shade from the window brackets. Roll upwardly the shade past hand, then supercede in the brackets. Repeat every bit necessary to become the desired tension. To loosen (decrease tension), heighten the shade to the top, and then remove the shade from the brackets. Unroll the shade virtually eighteen″, and then replace in the brackets. The jump roller should not be too tight. Remember, when the window shade volition non coil up, the spring is too loose. When it won't stay downwardly, the roller bound is too tight.
Caution: Over-winding may effect in permanent damage.
String Control Shades
Pulling gently on the cord in one direction raises the shade; pulling it in the other direction lowers it. On shades where the fabric rolls against the window, the front cord does the raining. On shades where the fabric rolls toward the room, the rear string does the raising.
Cleaning the Shades
- Dusting: Vacuum using the soft castor attachment.
- Washing: Use a material, sponge, or soft brush and a mild detergent. Use warm or cold h2o, not hot h2o. Pleace toweling on the floor or window sill and wash the blind in sections.
Deluxe Cordless Installation Instructions
Tools you lot will need
- Pencil
- Record measure
- Drill
- Screwdriver
- Pliers
- Appropriate fasteners
Step one. Mark the Bracket Locations
Brackets may be mounted to the wall, ceiling, or within of the window frame.
Critical Note: Installation brackets must be level to ensure that the fabric volition roll upwards properly, allowing for smooth functioning. Installation brackets must exist placed such that the outer edge of the brackets are i three/eight″ wider than the fabric. Mark the brackets for mounting hole locations.
Footstep ii. Subclass & Shade Installation
Brackets are not universal and take to be mounted correctly. Screw the brackets in place for inside, wall, or ceiling mountain.For regular gyre shades(fabric is rolled off the back of the roller), lift the shade upward to the brackets with the material hanging closest to the window.For opposite roller shades(fabric is rolled off the front end of the roller), lift the shade upwardly to the brackets with the fabric hanging closest into the room.
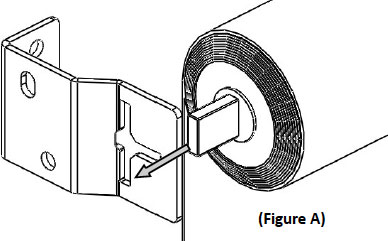

Set the spring end into the open slot in the bracket every bit shown inEffigy A.
Next secure the idler pin finish into the bracket equally shown inFigure B.
Please notation: Although the jump mechanisms are pre-tensioned at the factory, occasionally, they volition uncoil during shipping. If this occurs, the shade will not raise or lower properly. A simple adjustment of the leap can correct this problem.
To Tighten the Leap Tension

- Pull the shade down approximately 3-quarters.
- Remove the roller shade from its brackets.(Be sure to have bound mechanism in lock position)
- Gyre upwards the shade past hand being careful to roll the shade evenly on the tube.
- Supercede the roller shade in its brackets.
- Echo these steps if necessary until the y'all accomplish the desired tension.
To Loosen the Bound Tension

- Coil up the shade.
- Remove the roller shade from its brackets.(Be sure to have jump mechanism in lock position)
- Unroll the shade approximately halfway by mitt.
- Replace the roller shade in its brackets.
- Repeat these steps if necessary until yous achieve the desired tension.

Source: https://weldashading.com/how-to-install-roller-shades/
Posted by: reynoldscatiche.blogspot.com
0 Response to "How To Install Roller Shade Brackets"
Post a Comment